先说一下,自己是怎么遇到这个第三方库的,因为我上个礼拜在使用数据库GreenDao的时候,出了一些问题,当时数据库和网络请求都想用RxJava封装起来,已经写完了网络请求部分,等到使用GreenDao来构建的时候,发现它只是支持RxJava,对于最新的RxJava2不支持,而且最早更新已经是7个月前,issue很早有人提了这个问题,但是作者貌似并不想改了,所以我就想找一个替代它并且性能不能太差的第三方数据库,因为GreenDao作者是greenrobot,我看到了他目前比较活跃于ObejectBox这个项目,看了官方介绍和简略的文档之后,正好符合自己的需求,于是就决定使用它了。
本文只是简单介绍入门,发现在Google上搜索排名靠前,建议读者之间去官网 https://objectbox.io/,后续增加源码解读部分
ObjectBox的介绍
ObjectBox是一个专门为物联网和移动设备打造出的非常快速的面向对象的数据库,它有一下几个特点
- ObjectBox是小于1MB的,所以非常适用于移动App和小的物联网设备,
- ObjectBox是第一个高性能,NoSQL,并且兼容ACID的边缘数据库
- 目前已经有8万多个APP使用ObjectBox,
- ObjectBox比我们经常使用的SQlite数据库快10倍。
下图是每秒钟,ObjectBox插入数据的速度

- 当数据更改时,不需要做手动的迁移
- 多平台支持,C,java,swift,go
- 边缘计算: 在靠近物或数据源头的一侧,就近提供端服务
- NoSQl(not only SQL): 非关系型数据库,原有的关系型数据库管理系统(RDBMSs)单机无法满足数据容量的需求,很多时候需要使用集群解决问题,但是RDBMS的join,union操作,一般不支持分布式集群,所以NoSQL就出来了,它几个特点:非关系型的、分布式的、开源的、水平可扩展的
- ACID:指数据库管理系统在写入和更新数据的时候,保证事物的正确可靠,必须具有的四个特性,原子性,一致性,隔离性,持久性
ObjectBox使用说明(Java版本)
接入ObjectBox
在根目录的build.gradle,添加
1
2
3
4
5
6
7
8
9
10
11
buildscript {
    ext.objectboxVersion = '2.3.3'
    respositories {
        jcenter()
    }
    dependencies {
        // Android Gradle Plugin 3.0.0 or later supported
        classpath 'com.android.tools.build:gradle:3.3.1'
        classpath "io.objectbox:objectbox-gradle-plugin:$objectboxVersion"
    }
}
在APP或者module的build.gradle加入
1
2
apply plugin: 'com.android.application'
apply plugin: 'io.objectbox' // apply last
然后在你的Application中初始化
1
2
3
4
5
6
7
8
9
10
11
12
13
14
15
16
17
18
19
20
21
22
23
public class MyApplication extends Application {
    private static MyApplication mApplication;
    private BoxStore boxStore;

    @Override
    public void onCreate() {
        super.onCreate();
        mApplication = this;
        initDB();
    }
    private void initDB(){
       boxStore=MyObjectBox.builder().androidContext(mApplication.getApplicationContext()).build();
        AccountManager.getInstance().setCurrentAccountFromDB();
    }

    public static MyApplication getMyApplication() {
        return mApplication;
    }

    public BoxStore getBoxStore() {
        return boxStore;
    }
}
基本的注解介绍
这个相信使用过ORM类型数据库的都知道的
1
2
3
4
5
6
7
@Entity
public class Student{
    @Id public long id;
    public String name;
    public int grade;
    public int classId;
}
- @Id
ObjectBox的实体必须要有一个long类型的@Id属性,为了方便获取和引用对象,当然也可以使用java.lang.Long,但是官方不推荐使用。默认的情况下,一旦entity持久化,Objectbox就会分配一个ID给这个实体,可以不用管。(Tips:我们可以通过Id是不是0来判断,是否这个实体持久化,Id只有两个值是意外的:0和-1,0代表了为持久化,-1只在代码内部使用) 当然想自己赋值给Id属性也可以,设置一下Id注释1 2
@Id(assignable = true) long id;
这个允许我们赋值任何有效的Id(除0,-1),赋值0就意味着让ObjectBox赋值
- 其他类型值
ObjectBox获取实体属性的数据,不用加注解,但是需要保证下面两种情况之一- 成员属性的访问权限至少是“package-private”(包访问权限),只对自己包内所有类可见
- 提供标准的getter和setter方法(这个标准就是使用IDE自动生成的)
1
2
3
4
5
6
7
8
9
10
11
12
13
14
15
16
17
18
19
20
21
22
23
24
25
26
27
28
29
30
31
32
33
34
35
36
37
38
39
40
41
42
43
44
45
46
@Entity
public class Student {
    @Id
    private long id;
    @NameInDb("NAME")
    private String name;
    @NameInDb("GRADE")
    private int grade;
    @Index
    private int classId;
    @Transient
    private String className;
    private static int dormitoryId;

    public long getId() {
        return id;
    }

    public void setId(long id) {
        this.id = id;
    }

    public String getName() {
        return name;
    }

    public void setName(String name) {
        this.name = name;
    }

    public int getGrade() {
        return grade;
    }

    public void setGrade(int grade) {
        this.grade = grade;
    }

    public int getClassId() {
        return classId;
    }

    public void setClassId(int classId) {
        this.classId = classId;
    }
}
<1> @NameInDb("NAME")这个定义在数据库当中该属性的名称,定义这个之后,后面更改Java层面的属性名并不影响数据库
<2> @Transient和序列化的时候一样,标记这个属性不会被持久化
<3> static属性也不会被持久化
<4> @Index为对应的数据库列创建数据库索引(注:目前不支持byte[],float和double),这里作者还引入了Index type索引值的概念,之前的Index使用的都是属性值,现在可以对属性值进行 hash来构建index,比如String类型,因为作者觉得挺耗费空间
1
2
@Index(type = IndexType.VALUE)
private String name;
这里的IndexType有四个值:
- IndexType.DEFAULT不指定默认为DEFAULT,根据属性的值去使用最佳的索引方式(对于String类型使用hash,其他就直接使用值)
- IndexType.VALUE使用属性的值构建索引
- IndexType.HASH使用32位的hash值去构建索引,相比较64,hash冲突可能出现,但是实际并不会有性能上影响,优先使用这个
- IndexType.HASH64使用64位long类型去构建索引,这个需要更过的存储空间,往往不是最好的选择
(5)
@Unique表明在数据库当中,这个属性的值为唯一,否则抛出UniqueViolationException
数据之间的关系
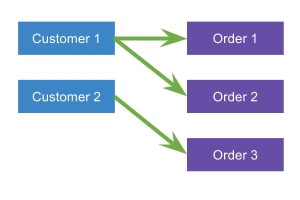
这个关系定义为:对象指向其他的对象,他们之间就叫有关系,有两种关系To one ,To many,这里需要注意两个概念source object定义关系的对象,target object被引用的关系对象
To-one关系
 一对一关系中:我们有三个方法来设置关系:
setTarget(entity) 让entity成为新的target,也可以是在数据库中已经存在的,null就是清除关系
setTargetId(entityId)这个Id是数据库中已经存在的实体Id,0代表清除关系
setAndPutTarget(entity)让entity成为新的target,并且把entity放进数据库中,如果原对象之前不在数据库中,在调用setAndPutTarget()之前需要调用attach
1
2
3
Son son=new Son();
sonBox.attach(order);//需要填写
son.customer.setAndPutTarget(father);
1
2
3
4
5
6
7
8
9
10
11
12
13
14
15
16
17
18
19
20
//Father.java 具体使用案例
@Entity
public class Father{
    @Id public long id;
}
//Son.java
@Entity
public class Son{
    @Id public long id;
    public ToOne<Father> father;
}

//在代码中如何添加
Father father=new Father();
Son son=new Son();
son.father.setTarget(father);
long sonId=boxStore.boxFor(Son.class).put(son);
//在代码中如何获取
Son son=boxStore.boxFor(Son.class).get(sonId);
Father father=son.father.getTarget(father);
如果Father对象不在数据库当中,那么就会把Father放进去,如果存在,就只是建立一个之间的关系
但是如果我们的target对象的Id是自己赋值的即@Id(assignable =true)那么就不会自动插入,需要我们自己手动执行如下代码
1
2
3
4
5
6
fatherBox=boxStore.boxFor(Father.class);
sonBox=boxStore.boxFor(Son.class);
father.id=110;
fatherBox.put(father);
son.father.setTarget(father);
sonBox.put(son);
我们也可以废除之间的关系,但是并不会在数据库中删除掉对应的target对象
1
2
son.father.setTarget(null);
sonBox.put(son);
ToOne关系的实现原理
我们可以查看我们项目的objectbox-models/default.json看到其实是在Son类里面增加了一个fatherId的属性,可以通过@TargetIdProperty(String),修改这个名称。如下所示:
1
2
3
4
5
6
7
@Entity
public class Son {
    @Id
    public long id;
    @TargetIdProperty("son_father_id")
    public ToOne<Father> father;
}
提高性能的技巧
如何提高性能?首先我们需要明白,我们使用ToOne的father对象的时候,代码里面是没有初始化这段代码的,son.father.setTarget(father);比如这一句,并没有报NullPointerException错误,因为在代码执行前,ObjectBox Gradle 插件在构造函数的时候,添加了初始化这个target entity的初始化工作。
为了提高性能,我们应该提供一个全属性的构造函数(包含target的Id,这个隐含属性可以在工程目录的object-models/defaoult.json里面找到)
To-Many关系
To-Many关系里面两种:一种是one-to-many,一种是many-many (对于To-many关系,在第一次请求的时候会被延迟的执行,然后缓存到to-many的source对象里面去,所以,对关系的get方法后续不会从数据库中查询到)
OneToMany
 我们使用注解
@Backlink实现
1
2
3
4
5
6
7
8
9
10
11
12
13
14
15
16
17
18
//Father.java
@Entity
public class Father{
    @Id public long id;
    @Backlink(to = "father")
    public ToMany<Son> sons;
}
//son.java
@Entity
public class Son{
    @Id public long id;
    public ToOne<Father> father;
}
//如何添加
Father father=new Father();
father.sons.add(new Son());
father.sons.add(new Son());
long fatherId=boxStore.boxFor(Father.class).put(father);
添加的规则也一样,如果@Id(assignable = true,那么不会自动插入,需要在添加之前执行,ObjectBox只放被引用对象ID为0的实体
1
2
3
4
5
6
7
8
9
10
11
12
13
14
15
16
17
18
//如果是source entity使用 @Id(assignable = true
father.id=12;
fatherBox.attach(father);
father.sons.add(son);
fatherBox.put(father);
//如果是target entity使用
son.id=12;
sonBox.put(son);
father.sons.add(son);
fatherBox.put(son);
//get
Father father=fatherBox.boxFor(Father.class).get(fatherId);
for(Son son: father.sons){
    //TODO ....
}
//Remove
Son son=father.orders.remove();
//参数既可以是son,也可以是数字
ManyToMany
使用注解ToMany
1
2
3
4
5
6
7
8
9
10
11
12
13
14
15
16
17
18
19
20
21
22
23
24
25
26
27
28
29
30
31
@Entity
public class Teacher{
    @Id public long id;
}
@Entity
publci class Student{
    @Id publci long id;
    public ToMany<Teacher> teachers;
}
//添加数据
Teacher teacher1 = new Teacher();
Teacher teacher2 = new Teacher();

Student student1 = new Student();
student1.teachers.add(teacher1);
student1.teachers.add(teacher2);

Student student2 = new Student();
student2.teachers.add(teacher1);
student2.teachers.add(teacher2);

boxStore.boxFor(Student.class).put(student1,student2);
//get
Student student1 = boxStore.boxFor(Student.class).get(student1.id);
for(Teacher teacher : student1.teachers){
    //TODO
}

//remove
student1.teachers.remove(0);
student1.teachers.applyChangesToDb();
如果想知道,一个老师有什么学生,可以写
1
2
3
4
5
6
7
8
9
10
11
12
13
14
15
16
17
18
19
// Teacher.java
@Entity
public class Teacher{

    @Id public long id;

    @Backlink(to = "teachers") // backed by the to-many relation in Student
    public ToMany<Student> students;

}
// Student.java
@Entity
public class Student{

    @Id public long id;

    public ToMany<Teacher> teachers;

}
查询
因为使用的是非关系型数据库,所以这里的查询通过构建一个QueryBuilder操作,下面只是一个小例子,具体的API可以看下源码
1
2
3
4
5
QueryBuilder<User> builder = userBox.query();
builder.equal(User_.firstName,"Joe)
        .greater(User_.yearOfBirth,1970)
        .startsWith(User_.lastName,"0");
List<User> youngJoes = builder.build().find();
Lazy loading results
为了避免加载查询结果太快,query提供了findLazy()和findLazyCached方法,返回LazyList
注: LazyList: 线程安全,不可修改的List
数据观察,DataObservers
1
2
3
4
5
private DataSubscriptionList subscriptions = new DataSubscriptionList();
Query<Task> query = taskBox.query().equal(Task_.complete, false).build();
query.subscribe(subscriptions)
     .on(AndroidScheduler.mainThread())
     .observer(data -> updateUi(data));
- 这条Query执行语句在后台执行
- 一旦query执行,之后,observer就会得到数据
- 无论何时 Task对象在未来改变了,这个query语句会再执行一遍
- 一旦结果更新了,就去提交给Observer
- observer调用在主线程,可以通过on指定
- subscribe(subscriptions)这个是用来跟踪所有的订阅,想取消观察,可以直接调用这个取消所有观察
- 这个subscribe只是默认会给两次通知,第一次subscribe之后执行,第二次是数据改变的时候,这个可以改变比如你只想要数据改变的时候需要在
subscribe()之后调用onlyChanges()
通用的应该是这个:
1
2
3
4
5
6
7
8
9
10
DataObserver<Class<Task>> taskObserver = new DataObserver<Class<Task>>() {
    @Override public void onData(Class<Note> data) {
        // do something
    }
};
boxStore.subscribe(Task.class).observer(taskObserver);

Query<Task> query = taskBox.query().equal(Task_.completed, false).build();
subscription = query.subscribe().observer(data -> updateUi(data));
线程调度
1
2
Query<Task> query = taskBox.query().equal(Task_.complete, false).build();
query.subscribe().on(AndroidScheduler.mainThread()).observer(data -> updateUi(data));
on()就是告知我们想要在哪个线程我们Observer被观察到
query默认在后台线程执行
数据流的改变
1
2
3
boxStore.subscribe()
    .transform(clazz -> return boxStore.boxFor(clazz).count())
    .observer(count -> updateCount(count));
我们可以在transform中对数据进行转换,比如查询出来的结果可能是List
支持RxJava
但是需要引入,官方封装好的三方库,操作就和RxJava一样了
implementation "io.objectbox:objectbox-rxjava:$objectboxVersion"